In the previous post, we have talked about passive reconnaissance to find information about the network. It was called passive reconnaissance because we did not get the information directly, We get all the information indirectly in many ways. Sometimes we called this way as an art.
In this post, we will switch to another technique of reconnaissance that we call active reconnaissance. Yes… it is the opposite of the previous one. We will try to be a little bit active and doing direct action to the target. So these are the objectives that we will do in this post,
- Conduct Network Scans to discover hosts, ports, and services.
- Enumerate additional detail from discovered hosts and services
- Perform vulnerability scans
- Analyze Basic Scripts
But because this topic is quite long, I will separate this topic into several parts, and this is the first part of the topic.
1. Scan Networks
Network scanning is the process of gathering information about computing systems on a network. This activity usually is the first step in active reconnaissance, where the attacker seeks to discover potentially vulnerable targets. What are the goals of doing these activities? Here are the targets :
- Gathering host discovery
- Know which ports are opened
- What kind of packet is crafted
- Enumeration the device
- Expose the vulnerabilities
For conducting these activities, we need a powerful tool, one of the tools is Nmap. Nmap or Network Mapper is the most widely used network scanner. It has been ported to most OS Platforms and the underlying scan tool in a number of commercial and open-source vulnerability testing products. Nmap also can incorporate scripts and has speed and performance setting for intrusion detection system (IDS) evasion, so we will use Nmap for :
- Host discovery
- Port/service discovery
- Operating System and service fingerprinting
- Enumeration
- Hardware (MAC) address detection
- Vulnerability / exploit detection
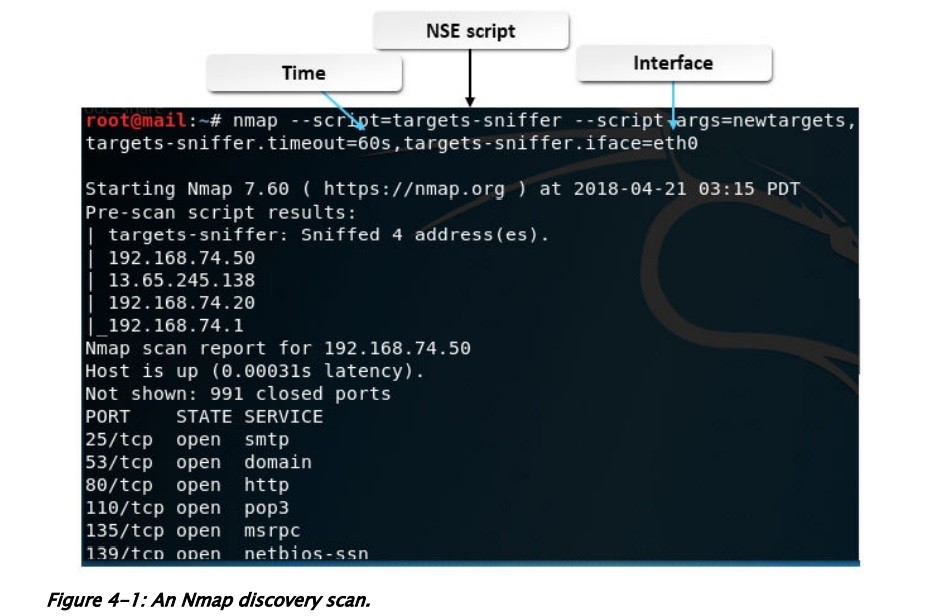
Ok, let’s try the Nmap.. but before it goes, you should know that scanning the network to another person’s network is ILLEGAL, So, let’s try Nmap only to our network or our own lab.
Nmap is command line based, though there are GUI variants like Zenmap. The basic syntax for Nmap is :
nmap [Scan Type(s)] [Option(s)] <target>
The syntax is not strict, you can usually arrange the scan type, options, and target in any order.
a. Nmap Scan Types
this table will describe popular Nmap scan types :
[supsystic-tables id=1]
b. In this second table will describe commands of Nmap options
[supsystic-tables id=3]
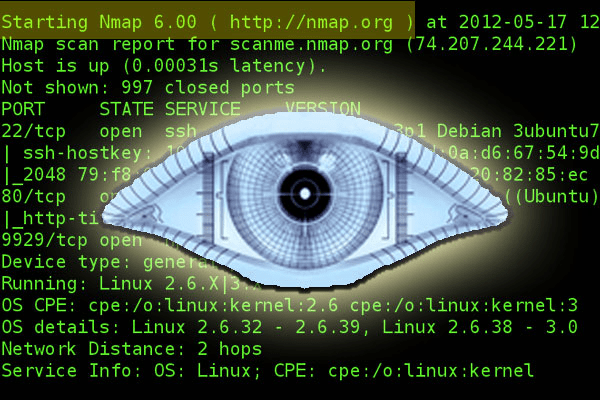
c. Discovery Scans
A discovery scan is used to find live IP addresses on a network for the purposes of revealing potential targets. Used to be, it was known as ping sweep, sending an ICMP ECHO REQUEST to every address in the specified range.
The following table summarizes common Nmap discovery scan types.
[supsystic-tables id=3]
Continue to Part 2